If your application already runs Mongock in production, the word "migration" probably sounds heavier than it needs to. You have years of change history in there, and the last thing you want is to rewrite it, re-run it, or lose your team's trust in what has already happened.
You don't have to do any of that. Flamingock is built to take over from Mongock without disturbing the past: your legacy changes stay exactly where they are, your audit history is imported for you, anything still pending gets executed, and everything new is written the Flamingock way.
This guide walks that path end to end.
Continuity, not a reset
The whole design goal here is continuity. In practice that means five things happen, and none of them ask you to touch your history:
- Your existing Mongock changes stay as historical artifacts.
- Your Mongock audit history is imported into Flamingock.
- Changes that already ran are recognised and skipped.
- Legacy changes still pending can run one last time.
- New changes are authored against Flamingock's APIs.
So this is a handover, not a rewrite. The past is preserved and the future moves to Flamingock.
Who this is for
You'll get the most from this guide if you're running one of the following:
- Mongock v4, with
@ChangeLogand@ChangeSet - Mongock v5, with
@ChangeUnit,@Execution, and@RollbackExecution
MongoDB is the most common starting point, so the examples lean that way. But the approach isn't MongoDB-specific — Mongock also backed DynamoDB and Couchbase, and the same principles carry over to those.
Before you start
A few things are worth confirming before you change any code:
- Your application already runs cleanly with Mongock today.
- You know which backend holds Mongock's audit history.
- You know which Mongock version you're on.
- You can test against an environment that includes a copy of your real Mongock audit history.
That last point matters more than it looks. A migration validated only against an empty database tells you almost nothing — the interesting behaviour is all in how Flamingock reads and reconciles history that already exists.
Legacy changes are immutable. Your existing Mongock changes are historical records, and they must not be edited as part of the migration. Rewriting a legacy change is the fastest way to break execution continuity. There's more on this in the documentation.
The migration, step by step
What follows is the manual path — six steps, start to finish. If you'd rather automate most of it, there's an AI-assisted route at the end that does the same work for you; it's worth reading the steps first so you know what the automation is actually doing.
Step 1 — Add Flamingock to the project
Gradle
With the Flamingock Gradle plugin, you don't declare the core or Mongock-support dependencies by hand — the plugin wires them for you:
plugins {
    java
    id("org.springframework.boot") version "3.2.0"
    id("io.spring.dependency-management") version "1.1.4"
    id("io.flamingock") version "[VERSION]"
}

flamingock {
    community()
    springboot()
    mongock()
}

dependencies {
    implementation("org.mongodb:mongodb-driver-sync:5.0.0")
}
The three lines inside the flamingock block do the work: community() pulls in the Community aggregate, springboot() adds the Spring Boot integration, and mongock() adds the migration support. The backend driver stays explicit — and if you're coming from Mongock, it's almost certainly already in your build.
Maven
For Maven, the same pieces are wired explicitly, plus the Flamingock plugin:
<dependencyManagement>
  <dependencies>
    <dependency>
      <groupId>io.flamingock</groupId>
      <artifactId>flamingock-bom</artifactId>
      <version>${flamingockVersion}</version>
      <type>pom</type>
      <scope>import</scope>
    </dependency>
  </dependencies>
</dependencyManagement>

<dependencies>
  <dependency>
    <groupId>io.flamingock</groupId>
    <artifactId>flamingock-community</artifactId>
  </dependency>
  <dependency>
    <groupId>io.flamingock</groupId>
    <artifactId>flamingock-springboot-integration</artifactId>
  </dependency>
  <dependency>
    <groupId>io.flamingock</groupId>
    <artifactId>mongock-support</artifactId>
  </dependency>
  <dependency>
    <groupId>org.mongodb</groupId>
    <artifactId>mongodb-driver-sync</artifactId>
    <version>5.0.0</version>
  </dependency>
</dependencies>

<build>
  <plugins>
    <plugin>
      <groupId>io.flamingock</groupId>
      <artifactId>flamingock-maven-plugin</artifactId>
      <version>1.0.0</version>
      <executions>
        <execution>
          <goals>
            <goal>generate</goal>
          </goals>
        </execution>
      </executions>
    </plugin>

    <plugin>
      <groupId>org.apache.maven.plugins</groupId>
      <artifactId>maven-compiler-plugin</artifactId>
      <version>3.11.0</version>
      <configuration>
        <annotationProcessorPaths>
          <path>
            <groupId>io.flamingock</groupId>
            <artifactId>flamingock-processor</artifactId>
            <version>${flamingockVersion}</version>
          </path>
          <path>
            <groupId>io.flamingock</groupId>
            <artifactId>mongock-support</artifactId>
            <version>${flamingockVersion}</version>
          </path>
        </annotationProcessorPaths>
      </configuration>
    </plugin>
  </plugins>
</build>
Step 2 — Register the Target System and Audit Store
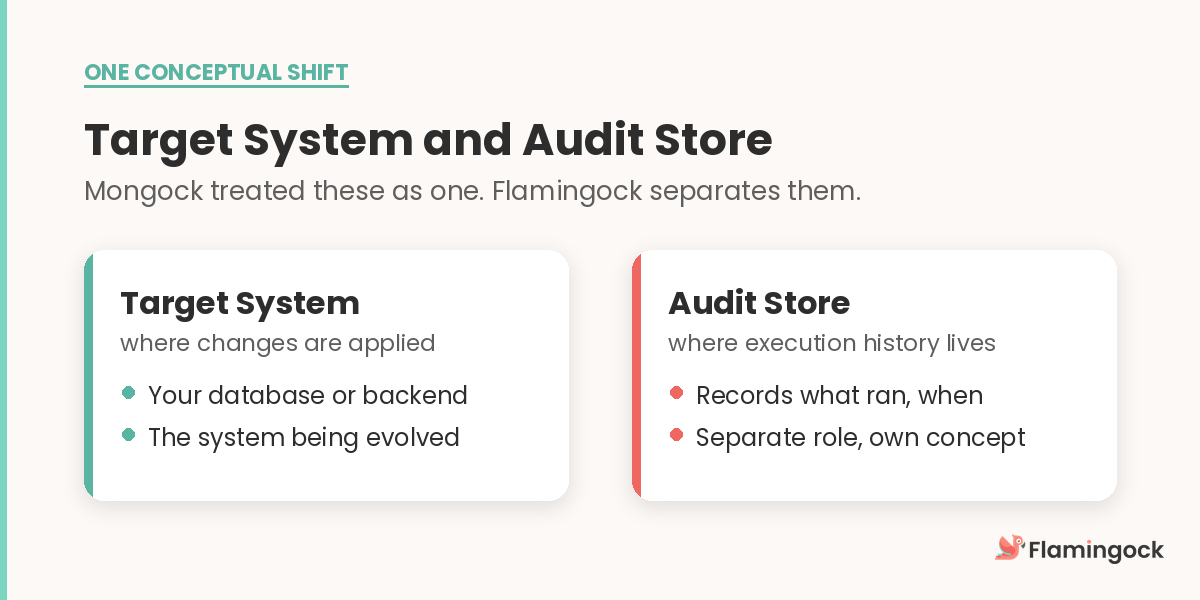
Here's the one conceptual shift worth pausing on. Mongock tended to treat two ideas as a single thing; Flamingock separates them:
- The Target System is where your changes are applied — your database or backend.
- The Audit Store is where execution history is recorded.
For MongoDB with Spring Boot, that looks like this (the MongoDBSyncTargetSystem and MongoDBSyncAuditStore types come from the MongoDB sync module you added in Step 1):
@Bean
public MongoDBSyncTargetSystem userDatabaseTargetSystem(MongoClient mongoClient) {
    return new MongoDBSyncTargetSystem("user-database-id", mongoClient, "users");
}

@Bean
public AuditStore auditStore(MongoDBSyncTargetSystem userDatabaseTargetSystem) {
    return MongoDBSyncAuditStore.from(userDatabaseTargetSystem);
}
During migration both may point at the same physical MongoDB database, and that's fine — they're still two distinct roles in Flamingock's model. Getting comfortable with that split is most of the conceptual work of moving over.
Step 3 — Enable Flamingock
In a Spring Boot application, enabling Flamingock is a single annotation pointing at where your changes live:
@EnableFlamingock(
    stages = {
        @Stage(location = "com.acme.orders.changes")
    }
)
@SpringBootApplication
public class MyApplication {
  public static void main(String[] args) {
    SpringApplication.run(MyApplication.class, args);
  }
}
Step 4 — Turn on Mongock support
Now add the bridge that makes the whole migration work — @MongockSupport:
@EnableFlamingock(
    stages = {
        @Stage(location = "com.acme.orders.changes")
    }
)
@MongockSupport(targetSystem = "user-database-id")
@SpringBootApplication
public class MyApplication {
    public static void main(String[] args) {
        SpringApplication.run(MyApplication.class, args);
    }
}
The targetSystem value has to match the Flamingock target system that represents the same backend Mongock was using. That target system is what lets Flamingock do two things during the transition: read the Mongock audit history, and execute any pending legacy changes against the right place.
If you need finer control — a custom audit origin, skipping the import, tolerating unknown legacy entries — the migration documentation covers the advanced options.
Step 5 — Run one clean build
If you're moving to Flamingock 1.3.0+, run a single clean build after adding the dependencies and before your first Flamingock run:
./gradlew clean build
# or
mvn clean install
This isn't busywork. Flamingock generates metadata about your changes at build time via an annotation processor, and a clean build regenerates it correctly. Skip it and you can hit a confusing failure mode where the changes are right there in your code but appear to be missing at runtime.
Step 6 — Validate
After the first Flamingock run, four checks tell you the migration landed:
- Audit import completed. Compare the old Mongock audit collection against the new Flamingock audit store — everything Mongock recorded should now be represented in Flamingock too.
- Already-executed changes were skipped. In the first run's logs, confirm nothing that already ran under Mongock ran again.
- Pending changes were applied. Any legacy changes that were still pending should now show as executed.
- The final state matches. Line up Flamingock's audit entries against the Mongock history you tested with — same executed set, no gaps, no duplicates.
You can run those same checks through the CLI instead of inspecting the store by hand, using your application JAR as the source of truth:
# Snapshot of the current audit state
flamingock audit list --jar ./my-app.jar

# Optional: full audit history
flamingock audit list --jar ./my-app.jar --history

# Optional: surface inconsistent states that need attention
flamingock issue list --jar ./my-app.jar
A healthy snapshot looks like this:
Audit Entries Snapshot (Latest per Change Unit):
==================================================

┌──────────────────────────────┬────────┬──────────────────┬─────────────────────┐
│ Change ID                    │ State  │ Author           │ Time                │
├──────────────────────────────┼────────┼──────────────────┼─────────────────────┤
│ create-users-collection      │ ✓      │ platform-team    │ 2025-01-07 10:15:23 │
│ add-user-indexes             │ ✓      │ platform-team    │ 2025-01-07 10:15:24 │
│ seed-initial-data            │ ✓      │ data-team        │ 2025-01-07 10:15:25 │
└──────────────────────────────┴────────┴──────────────────┴─────────────────────┘

Legend: ✓ = EXECUTED | ✗ = FAILED | ▶ = STARTED | ↩ = ROLLED_BACK

Total: 3 entries
The signal you're looking for: your legacy Mongock changes show up as executed, with nothing failed or half-finished left behind. As a routine, that's:
- Run the application once with Flamingock enabled.
- Run
flamingock audit list --jar ./my-app.jar. - Confirm already-executed legacy changes appear — and didn't run again.
- Confirm previously pending changes now show as executed.
- Run
flamingock issue list --jar ./my-app.jarand check there are no inconsistent states.
If your app needs profiles or other runtime arguments, pass them straight through:
flamingock audit list --jar ./my-app.jar -- --spring.profiles.active=staging
Collection and field names depend on your backend. In MongoDB, the defaults are Mongock's mongockChangeLog and Flamingock's flamingockAuditLog, so those are usually the first two to compare. If you renamed either, compare your configured stores instead.
Let an agent do the heavy lifting
Now that you've seen the steps, here's the shortcut. If you work with an agentic coder — Claude Code, Codex, Gemini, OpenCode — you can hand most of this migration to Flamingock's dedicated Mongock migration skill.
Install the Flamingock skills in your repository:
flamingock install-skills --agent opencode
Then ask your agent to run the migration:
Migrate this project from Mongock to Flamingock [VERSION]. Use the Flamingock Mongock migration skill.
If the skill is installed, the agent will tell you it's using it — the wording varies, but you'll see something like:
Using flamingock-mongock-migration-skill…
Under the hood it follows the exact path above: wiring Flamingock, enabling @MongockSupport, leaving your legacy changes untouched, and setting the project up for Flamingock-native changes.
Two things to keep in mind. The skills are in beta, so treat them as a strong head start rather than the final word. And whether an agent or a human did the setup, still validate against real Mongock audit history before you roll to production — the automation saves you typing, not judgement.
Installation details live in Using Flamingock with agentic coders, and the skill itself is covered in the Coming from Mongock docs.
From here on, write Flamingock
Once the bridge is in place, all new work is authored in Flamingock rather than Mongock:
@TargetSystem("user-database-id")
@Change(id = "create-order-status-index", author = "team")
public class _0001__CreateOrderStatusIndex {

    @Apply
    public void apply(MongoDatabase database) {
        database.getCollection("orders")
            .createIndex(Indexes.ascending("status"));
    }

    @Rollback
    public void rollback(MongoDatabase database) {
        database.getCollection("orders")
            .dropIndex("status_1");
    }
}
That leaves you with a clean boundary: legacy Mongock changes stay historical, their execution state is preserved, and everything you build next runs on Flamingock. You can read more about authoring Flamingock-native changes in the docs.
What actually happens on the first run
It's worth understanding the transition point itself, because the first Flamingock run after you enable Mongock support is doing more than a normal startup.
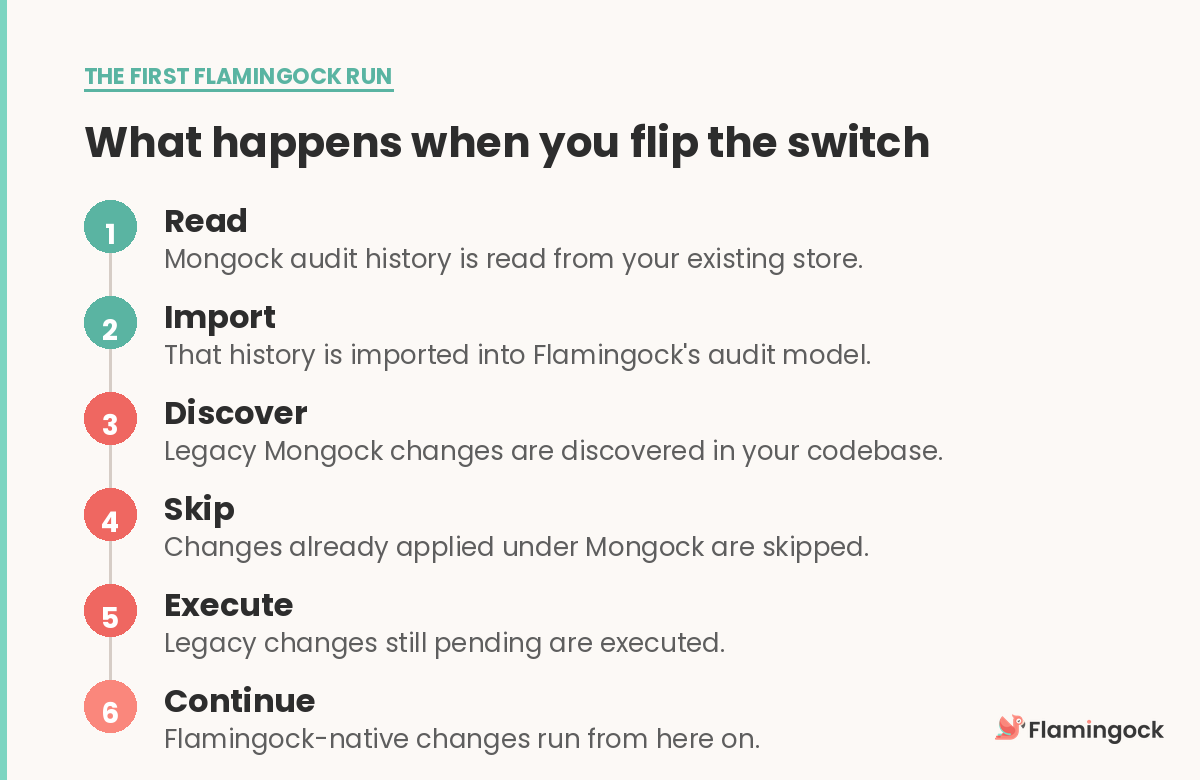
In order, Flamingock will read your Mongock audit history, import it into its own audit model, discover your legacy Mongock changes, skip the ones already applied, execute any still pending, and then carry on with your Flamingock-native changes. That sequence is exactly why the migration preserves continuity without a rewrite — and it's also why that first production run deserves to be treated as a planned migration event, not just another deploy.
Reference
Annotation mapping
Coming from Mongock v5, the mapping is direct:
| Mongock | Flamingock |
|---|---|
@ChangeUnit |
@Change |
@Execution |
@Apply |
@RollbackExecution |
@Rollback |
@ChangeUnitConstructor |
@FlamingockConstructor |
From v4 it's more conceptual: @ChangeLog and @ChangeSet stay part of the legacy model, and all new work is authored as standalone @Change classes.
Features that need a second look
A handful of Mongock features deserve explicit review and their own validation before you migrate:
@BeforeExecution@RollbackBeforeExecutionrunAlwayssystemVersionMongockTemplate
v4 vs v5 vs Flamingock at a glance
| Topic | Mongock v4 | Mongock v5 | Flamingock |
|---|---|---|---|
| Main unit | @ChangeLog + @ChangeSet |
@ChangeUnit class |
@Change class |
| Execution method | @ChangeSet method |
@Execution |
@Apply |
| Rollback method | environment-dependent behaviour | @RollbackExecution |
@Rollback |
| Pre-execution hook | not part of the primary model | @BeforeExecution + @RollbackBeforeExecution |
model the intent explicitly |
| Spring wrapper | MongockTemplate in Spring Mongo setups |
direct injection into @ChangeUnit |
direct injection into @Change |
| Audit default | mongockChangeLog |
mongockChangeLog |
flamingockAuditLog |
| Lock default | mongockLock |
mongockLock |
flamingockLock |
| Spring Boot runner | old Spring integration | MongockSpringboot / standalone runner |
ApplicationRunner or InitializingBean |
| Architectural model | database migration tool | cleaner ChangeUnit model, still database-centric | explicit Target System + Audit Store |
The practical takeaway: on v4, leave the old @ChangeLog / @ChangeSet code alone; on v5, leave the old @ChangeUnit code alone; in both cases, write new work in Flamingock once the bridge is active.
Taking it to production
Three habits make the production rollout uneventful.
Test against real history — real audit entries, real executed changes, real pending ones, realistic lock and startup timing. An empty environment hides the behaviour that matters.
Treat the first production run as a migration event: observable rollout, clear logs, controlled timing if you need it, and recovery prepared at the platform level.
And don't bundle it with unrelated changes. Framework upgrades, driver swaps, package refactors — keep them out of this change. When too much moves at once, a failure is far harder to attribute, and it's easy to blame the wrong thing.
Migration checklist
- Flamingock dependencies are in place
-
@MongockSupportis configured - The Target System points at the backend Mongock managed
- The Audit Store is configured
- Historical Mongock changes were left untouched
- A clean build was run once
- The migration was tested against realistic audit history
- The first production run is planned as a controlled transition
- New changes will be written in Flamingock, not Mongock
FAQ
Do I need to rewrite my old Mongock changes? No. Treat them as immutable historical artifacts — they shouldn't be rewritten as part of the migration.
Can Flamingock skip changes Mongock already executed? Yes. It imports the Mongock audit history and uses it to recognise what already ran. That's what makes the migration safe.
What if I still have pending Mongock changes? They can still run during the transition, once Flamingock has imported the historical audit state.
Can I keep using Mongock for new changes afterwards? No. The bridge exists only to preserve and finish legacy changes during the transition. After that, new work is authored in Flamingock.
Does this only apply to MongoDB? No. MongoDB is the common example, but the same approach applies to the other backends Mongock supported.
What should I check before the first production run? At a minimum: the target system mapping, the audit store configuration, that legacy changes are untouched, the clean build, and the audit-history behaviour in a realistic pre-production test.
The takeaway
The right way to move from Mongock to Flamingock isn't to rewrite the past. It's to preserve your historical changes, import your audit continuity, run only what's still pending, and move all new work to Flamingock-native changes. That's what makes this a genuine migration path rather than a disruptive reset.
For the complete reference, see the official migration documentation.